Our Azaleas are still looking pretty even though the spots have appeared these last few days and some of the blooms are falling to the ground. The Bumble Bees don't mind at all though. They are still buzzing around and taking some drinks from them.
I've enjoyed messing around with my Cameo and experimenting with new and different things. I never had a Gypsy like so many of you out there, so I never really got to do a lot of welding and stuff in my cardmaking and scrapbooking. Yesterday I created that Hippo with the scalloped edge from a label file by welding it together. Today I experimented with something a little different.
Enjoy the video and then read on for more detailed information.
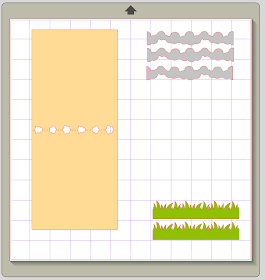
I started out with a set of borders I downloaded from the Silhouette Online Store:
I knew I wanted to use the clouds and the grass from this cut file. So springy and pretty. So the first thing I did in my Silhouette software was draw a square with the drawing tools. I went to the size menu and changed it to 4 1/4" x 5 1/2".
Then I dragged the cloud strip over and put it on the top of the card shape and played with the size a little bit until it fit across the top exactly.
I grouped the card shape and the cloud cut together and then clicked on WELD. Voila! Half way there to making my own custom card shape!
After welding these two shapes together for the front of the card, I copy and pasted it, and flipped it upside down, dragged it down to barely overlap with the clouds on the other card shape, selected them all, and clicked WELD again! Oh my gosh! I have a card with a cloud shaped top! This is so cool. Then I added some tiny little cut lines all along where I wanted the card to fold. I used BoBunny Double Dot cardstock for the card base and white cardstock (from Office Depot) for the clouds. The green grass was cut using Colorbok pattern paper (from Walmart).
Now all I have to do is cut! I had the card and cloud strips highlighted to cut and sent it to my Cameo. Since these papers were regular cardstock, I could use the same settings to cut them both. However, I removed the cut lines from the grass so they would NOT cut yet. After the card shape and clouds cut out, I left my mat still loaded into the Cameo, went to my software and switched everything. I told the card base and clouds NOT to cut, and turned on cutting for the grass. The grass was being cut on very thin paper, so I changed my cut settings, and then sent it to the Cameo to cut. Since my paper was already loaded from the previous cuts, it just got right to cutting. Voila!
I knew I wanted to use a SWEET Bear with Sunflower cut from Scrapping Bug Designs. So I opened up a new mat in my software and got those pieces all laid out just like I wanted them.
The bear is adhered to the card with 2 thicknesses of foam tape for dimension.
The edges of the grass were inked with Tim Holtz Peeled Paint Distress ink.
The clouds were inked around the edges with Stamin' Up Bliss Blue (retired).
The sentiment is from Cardz TV Stamps "Beary Sweet" set and stamped using Stamin' Up Close to Cocoa ink (retired) and stamped on to a label using SU Modern Label punch.
I'm tickled with how this little bear and custom card shape came out! Don't forget to watch the video above because I give you a QUICK TIP for sentiment placement on punched labels or tags.
I know this was a long post for me, so thank you for hanging in there until the end! I'll be back soon with another video and craft creation. Enjoy your day!
Shop some of my favorite products used in this project with these links:
Cardz TV Stamps (Beary Sweet stamp set)
TSQ's Royal Castle Shoppe on FB (foam tape and BoBunny double dot cardstock)
Stampin' Up (inks, bear / flower / leaf cardstock, and label punch)
Close To My Heart (inks)
Silhouette Online Store (Spring Boarder set of 4)
Scrapping Bug Designs (Bear SVG)
I'd love you to FOLLOW me on BlogLovin' !
Thanks for stopping by today! :) Janis
Entered:
Totally
Gorjuss -
#179 Spring Shades (Sat)
Scrappy
Frogs - M -
(April) Think Spring (ends 4th May) (Sun)
Three
Scrappy Gals - M,
E2,(April)Earth/Nature/Recycling (Mon)
Bearly
Mine Challenges W, 2E,
SIO - #82
Spring Flowers (Tues)
Crafts
and Me -
#129 Bling
(Wed)
Creative
Moments - 2W,
3E -
#15 Spring
(Wed)
Inky
Impressions - SIO -
#105 Punches/dies
(Wed)
Nutcrafters - 2W,
SIO, 1E -
#41 Anything goes
(Wed)
Penny's
Paper-Crafty - 3E
- #123 Sentiment
(Wed)
Sisterhood
of Crafters - 2W,
3E - Animal(2nd
week)
(Wed)
Whimsical
Designs - E1- Flowers
(Wed)
Forever
Friends - M -
(April) Die cuts and punches (Thurs)
MilkCoffee
Challenge - 2W,
3E, SIO
(W2 of 2) Welcome Spring
(Thurs)
Sarah
Hurley Challenges - M, C10 -
#79 (April) - Projects with Character
(Thurs)
Shelly's
Images - SIO,
2W -
(W1 of 2) April Showers Bring May Flowers...must have a flower
(Thurs)
Vicky's
Place - M - #2 Teddy
with a Friend (ends 1st May)
(Thurs)

.jpg)
.jpg)


.jpg)
.jpg)
.jpg)
.jpg)
.jpg)
.jpg)