My first thought was to create a CAS (clean and simple) card.
Yeah, that didn't happen. LOL
But I love how this card turned out!
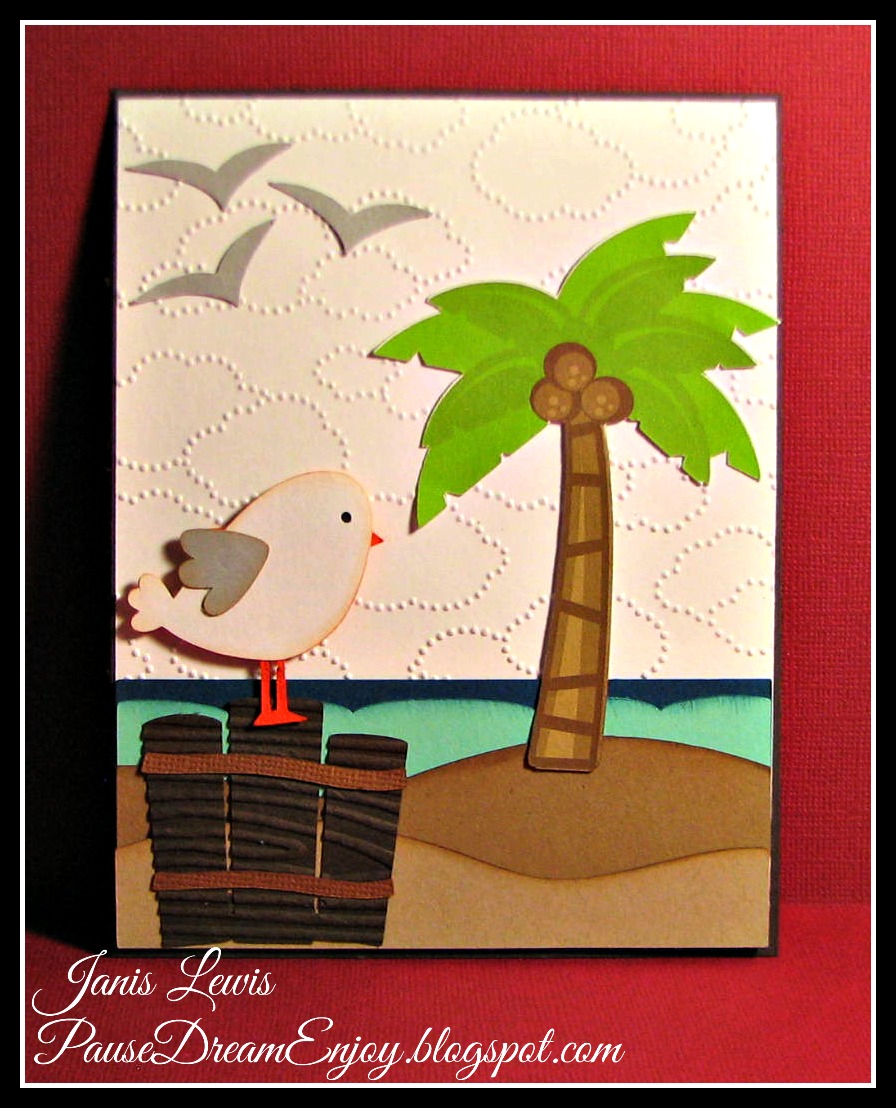
Most of the elements on this card are die cuts.
The palm tree is a PRINT-n-CUT on the card.
Isn't it pretty?
Photo heavy coming up.
I decided to give you screenshots of each step to use the
Print-n-Cut feature.
Hope this helps you decide to give it a try if you've
never used the Print-n-Cut feature before
Step 1:
Pull a file onto your Silhouette software virtual mat.
In this example I pulled Miss Kate Cuttables Beach Scene jpeg format.


The Cameo will move around your mat
to find the registration marks.
This is how it knows where the image is
and where to cut.
Click on Cut.
Voila!
Success!

But I love how this card turned out!
Most of the elements on this card are die cuts.
The palm tree is a PRINT-n-CUT on the card.
Isn't it pretty?
Photo heavy coming up.
I decided to give you screenshots of each step to use the
Print-n-Cut feature.
Hope this helps you decide to give it a try if you've
never used the Print-n-Cut feature before
Step 1:
Pull a file onto your Silhouette software virtual mat.
In this example I pulled Miss Kate Cuttables Beach Scene jpeg format.
Step 2:
Click on the TRACE button.
Click on Select Trace Area.
UNcheck High Pass Filter.
Change the percentage on the Threshold
until the image you want is mostly yellow.
Step 3:
Click on Trace & Detach.
Move the image away from the rest of the stuff it left.
Delete all that stuff you don't want.
Re-size your image to meet your requirements
for your project.
Step 4:
Click on Page.
Click on the size of your paper you will print on.
Click on Portrait or Landscape.
Click on the size of your cutting mat.
Step 5:
Click on Registration Marks.
CHECK the box to Show Registration Marks
on your print out.
Step 6:
Click on SEND TO SILHOUETTE.
Or you can click on the printer icon.
If you click on Send to Silhouette,
then choose to either
print
or
skip printing.
If you haven't printed yet, you'll need to do that.
Step 7:
After you have printed,
simply place the paper on your cutting mat.
Insert into your Cameo.
Click Detect Automatically.
The Cameo will move around your mat
to find the registration marks.
This is how it knows where the image is
and where to cut.
Click on Cut.
Voila!
Success!
- Stampin' Up:
- Cloud embossing folder
- solid cardstock
- Miss Kate Cuttables:
- Beach Scene - Palm Tree (using Print-n-Cut feature)
- Smooth Sailing - Seagulls flying
- By the Sea - Seagull sitting on pier logs
- My Scrap Chick:
- Buckles & Borders - used for all the sand, ocean, and horizon cuts
- Foam squares to adhere standing seagull for dimension (Royal Castle Shoppe)
- Some images inked around the edges with various inks and colors
Thanks for stopping by today!
:) Janis
Submitted:
Allsorts - anything to do with water
Inkspirational - photo inspiration (see below)

Creative Card Crew - masculine
Penny's Paper Crafty - anything goes
Submitted:
Allsorts - anything to do with water
Inkspirational - photo inspiration (see below)
Creative Card Crew - masculine
Penny's Paper Crafty - anything goes
Cute!!
ReplyDeleteToo cute!
ReplyDeleteThanks for joining us at Allsorts, your card is great, xxxx
ReplyDeleteThank you SOOOO much for the Silhouette process pictures. I really needed this to get inspired again. Your card is fabulous. <3Kim
ReplyDeleteSo many fun elements on one cars. I love the texture o those clouds.
ReplyDeleteJanis, I have spent the last 3 weeks trying to learn to print and cut with my new Cameo. I have scoured the internet for step by step instructions. I cannot express how very THRILLED I am to
ReplyDeletehave found this post. I am pinning it and printing it so I will always have it in case I forget something. I love Miss Kate Cuttables and now I can use and enjoy them. Thanks and Hugs to you!!!
I am so impressed with how this card came together and I am thankful to you for showing us the process!! This card is just fresh, lovely and beckons to me to go to the beach!! A thing of beauty - thank you for sharing!!
ReplyDeleteA lovely summertime card Janis and just perfect for this weeks Allsorts theme, thank so much for joining in.
ReplyDeleteB x
Fabulous scene and great tutorial. Thanks for joining is at Ink
ReplyDeleteThis is a great beach scene Janis-love it. Hugs, Brenda
ReplyDeleteSuch a fabulous beach scene card. Thanks so much for the tutorial. I recently got a Cameo and haven't had the chance to learn how to use it.
ReplyDeleteThank you so much for this tutorial! Now I know how to do this!
ReplyDeleteAnita
Awesome card! Love the scene ~great tutorial to!
ReplyDeleteSherrie K
A really fun card and a great tutorial.
ReplyDeleteThanks for joining us at Creative Card Crew.
Mari
Super cute card. Love the cloud embossing and the sea gulls on the pier. Thanks for the tutorial!!
ReplyDeleteGreat scene and card. Thanks for sharing at Penny's this week.
ReplyDeleteCheers Nicole
Lovely card and great to see how you put it together.
ReplyDeleteThanks for joining us at Penny's.
Helen x
Wow... what a fresh, summer-like card! I love all the layers that make up your final product. The print and cut addition is great. Looks good! Thanks for sharing with us at Inkspirational!
ReplyDelete- Shauna